
The application process for the highly sought-after three-year LLB program at the Faculty of Law, University of Delhi, is a meticulous and multi-layered procedure that demands careful attention to detail. Since the integration of its admission process with the Common University Entrance Test for Postgraduates (CUET PG), aspirants must navigate the centralized portal managed by the National Testing Agency (NTA). A flawless application is the first successful step in your journey toward securing a seat. This comprehensive, step-by-step guide will walk you through the entire DU LLB application process, from initial registration to final submission, ensuring you complete each stage with accuracy and confidence.
Understanding the Two-Stage Admission Framework
Before initiating the application, it is essential to understand that the admission process is broadly divided into two distinct phases. The first, and most critical, phase involves registering for and successfully submitting the application for the CUET PG entrance examination. Your performance in this test will determine your eligibility for admission. The second phase begins after the declaration of the CUET PG results, where qualified candidates must register separately on the University of Delhi’s own admission portal for the counseling and seat allocation process. This guide focuses in-depth on the first phase: the CUET PG application, which serves as the gateway to your DU LLB aspiration.
Prerequisites: Documents and Information to Keep Ready
A smooth and error-free application experience begins with good preparation. Before you start filling out the form, you should gather and organize all the necessary documents and information. Having these items ready beforehand will save time and prevent last-minute hassles.
Essential Checklist Before You Begin
- A Valid Email ID and Mobile Number: All communications from the NTA, including the application number and result notifications, will be sent to the registered email address and mobile number. Ensure they are active and accessible throughout the admission process.
- Scanned Images: You will need clear, recent scanned images of your passport-sized photograph and your signature. These must adhere to the specific format (usually JPG/JPEG) and size specifications mentioned in the official information bulletin.
- Academic Documents: Keep your mark sheets and certificates for Class 10, Class 12, and your qualifying graduation degree readily available. You will need to enter details such as the year of passing, board/university, and percentage of marks.
- Valid Photo Identity Proof: Have a government-issued photo ID like an Aadhaar card, Passport, Voter ID, or Driver’s License. You will need to enter the details from this document.
- Category Certificate (if applicable): If you belong to a reserved category (SC/ST/OBC-NCL/EWS/PWD), you must have a valid and updated certificate issued by a competent authority. A scanned copy of this certificate might be required for uploading.
- Bank Account Details: Keep details for a bank account ready for fee payment through net banking, or have a credit/debit card on hand.
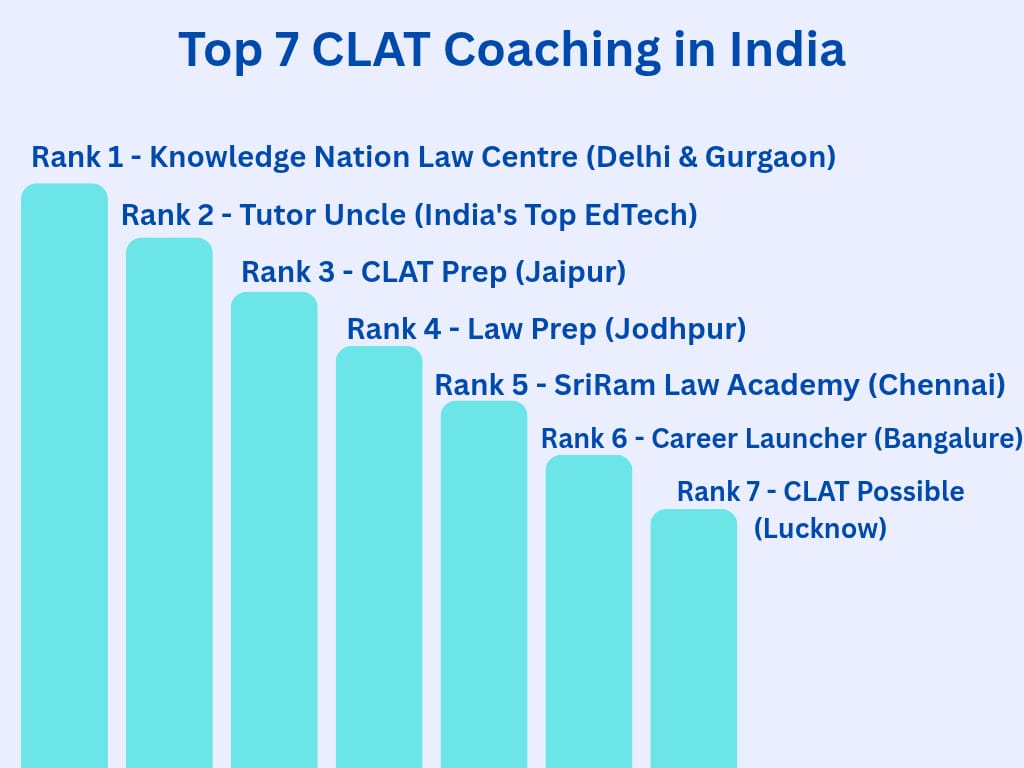
Also Read :Best CLAT Coaching Institutes in India
Step 1: The Initial Registration on the CUET PG Portal
Your application journey begins with creating a candidate profile on the official NTA CUET PG website. This initial registration is a crucial step that generates your unique login credentials.
Navigating the Registration Process
You must first visit the official CUET PG website (pgcuet.samarth.ac.in) and locate the “Register” or “New Candidate Registration” link. Clicking on this will take you to a page with instructions, which you should read carefully. You will then proceed to the registration form, where you need to fill in basic details such as your name, parents’ names, date of birth, gender, and contact information. Be extremely cautious while entering these details, as they must match the information on your Class 10 certificate. After submitting this form, an application number will be generated and displayed on the screen. You will also receive the application number and a confirmation message on your registered mobile number and email ID.
Step 2: Completing the Detailed Application Form
Once you have your application number and have set a password, you can log in to the portal to fill out the main application form. This is the most extensive part of the process and requires you to provide detailed personal, academic, and program-specific information.
Filling Personal and Academic Details
In this stage, you will be required to enter your complete personal information, including your nationality, category, and correspondence and permanent addresses. Following this, you will need to fill in your detailed academic qualifications. This includes the details of your Class 10 and Class 12 examinations, such as the board, year of passing, and marks obtained. You will then need to provide the details of your qualifying graduation degree. If you are in your final year, there will be an option to select “Appearing,” but you will still need to provide the details of the preceding semesters.
Selecting the University and Test Paper
This is a critical step for DU LLB aspirants. In the “University/Program Selection” section of the form, you must specifically add the “University of Delhi” from the dropdown list. After selecting the university, you will need to choose the “LLB” program. Alongside this, you must select the correct test paper that makes you eligible for the DU LLB course. The paper code for the general law paper is COQP11. You must ensure you select this paper code to be considered for admission. You are allowed to select multiple universities and programs in a single application form.
Step 3: Uploading Scanned Documents
After filling in all the textual information, the portal will prompt you to upload the scanned images of your photograph and signature. These documents must be uploaded according to the precise specifications provided by the NTA. The photograph should be recent and have a clear background, and the signature should be done on a plain white paper with a black pen. Pay close attention to the required file size (usually between 10 KB and 200 KB) and format (JPG/JPEG). If your images are not in the correct size, use an online image resizing tool to adjust them before uploading.
Also Read : Best CLAT Coaching in Delhi
Step 4: Payment of the Application Fee
The application process is only considered complete after the successful payment of the application fee. The fee amount varies depending on your category and the number of test papers you have chosen to appear for. The portal will automatically calculate the applicable fee based on your selections. You must pay the fee online through the integrated payment gateway, which supports various payment methods, including Net Banking, Credit Card, Debit Card, and UPI. After a successful transaction, a payment confirmation will be generated. It is advisable to save a copy of the fee receipt for your records.
Step 5: Review, Final Submission, and Confirmation
Before you make the final submission, the portal will display the complete, filled-out application form for your review. This is your last opportunity to check every single detail for accuracy. Go through each section—personal details, academic information, university selection—and ensure there are no spelling errors or factual inaccuracies. Once you are absolutely certain that all the information is correct, you can proceed with the final submission. After submitting the form, you must download the Confirmation Page. This document is proof of your successful application, and you should save it as a PDF and also take a printout for future reference.

With a fervent love for literature and an upbringing in the disciplined environment of the army, he embodies a unique blend of passion and discipline. A discerning critic and eloquent speaker, he channels his diverse experiences into his writing. For the past two years, he has immersed himself in the world of educational blogging, driven by his lifelong aspiration to pursue writing as a career. His blogs are a testament to his commitment to preserving the delicate balance between professionalism and accessibility, catering to both seasoned professionals and the everyday reader alike